
By Jerry Leih
Note: I have listed the products that I use for this aspect of my hobbying. My mentioning them here is not an endorsement, only a statement of use and a few of their advantages. There are other products that are available that will serve your purposes equally well. As with all hobby and construction materials, read and heed the precautions, do's and don'ts associated with their use. I use safety equipment. Period. And adequate ventilation is a must. I also select and use non-toxic products where ever possible. It is up to you to safeguard your health and safety and that of those in your life-circle. Enjoy your hobby responsibly, and show us all your dang efforts, we love seeing what you've done!
I'll take off my Jelly-Stone Park Ranger hat now, put on the dust mask and dive into: HOW TO MAKE PROPELLER MASTERS! Incidentally, the propellers starring in this article are intended for an RC 1/72nd scale model of the 1907 HMS VELOX, plans featured in a very fine book entitled "The First Destroyers", by David Lyon. Velox was a Torpedo Boat Destroyer, the first in-commission turbine powered warship in any Navy. It later fell victim to a mine at the close of WWI. Mr. John Haynes has produced a very fine model of this ship in 1/96th scale that you can see on his website (John: you ought to post your many photos of Velox on Warship Models Underway for us all to see in stark raving color!)
Prop masters are made by making one left hand blade, and one right hand blade that are mirror images of each other (if you are going to do a counter rotating set). I always make left and right-handed pairs as it is nearly as easy to do, and more ship applications are possible if both left and right-handed propellers are available. Fixtures are needed to make each blade-master and get a true helicoidal shape to them (The Helicoidal shape is a true screw shape and is exact scale in appearance, unlike soldering penny's on a hub). Once the blade masters are done, a rubber mold is made and left and right-handed blades are cast in JB-Weld structural epoxy. Enough are cast to make up the total number of blades that are needed. Another fixture is used to assemble the blades precisely to their respective hubs, which become the propeller masters. They can be assembled with 2, 3, 4 blades or however many blades are on the propellers you are modeling. The remainder of this article details making the fixtures, master blades, hubs, and assembling the blades into propeller masters. It does not cover rubber mold making, although it may be the subject of a later article. But for now, it is assumed that you have rubber mold making skills. If not, it is a relatively simple process. Most RTV mold rubber manufactures have "How-to's" on their websites. I use "SMOOTH-ON" brand. It is easy to use and durable. Sometimes sampler kits are available at a cost less than you can get through a hobby shop. Here is the URL to their website.
Blade Master Assembly Fixture
Once a propeller type and size is determined for a model, a cardboard rocket tube about the same diameter as the propeller is cut in a spiral pattern as the beginning step in making the master-blade assembly fixture. The Pitch of the propeller is controlled by the steepness of the spiral ramp. A 30 or 45 degree drawing triangle can be used to make a smooth spiral as the line is marked.
Take your time and match both cut-tubes (scissors work fine) as closely as possible if counter-rotating props are made. Cut a piece of balsa to fit inside the bottom of the tube. Drill a hole in the Exact center of it and insert an aluminum or brass tube into the hole, making sure it is straight up and down.
Next, glue short strips of wood around the tube in a circular stair case pattern, making sure that they are long enough to go past the spiral cut tube. Use basswood thin enough to allow one piece to just fit on top of the other as the pieces are fanned out and glued around the tube in stair step fashion. Cellulose wood glue like DUCO Cement should be used as it will cut and sand easily. White glues are rubbery when dry and hard to sand. Super glues may be used, but may also be difficult to sand.
Extend the "fanning" of the strips beyond the width of the propeller blades by a couple strips at each end of the "stairs" to make sure you have enough area to cut the blade shape from. Propeller blades are generally thicker at the root, next to the hub than at the tip, like an airplane wing. To do this tapering you may need a second layer of strips on top of the first that reach most of the way out to the end of the lower layer.
Note:
Don't use flat-toothpicks, as their grain is hard and unpredictable. Their thickness about right but they are hard to whittle and sand!!! Visit your local hobby shop instead and buy some basswood in thin rectangular cross-sectioned strips of the size that will suit your needs.
After the blade masters are assembled and completely dry, cut the spiral tube and balsa away from the masters, leaving the blades attached to the tubing. DUCO Cement will be easy to cut. If the wood strips breaks away from the tube use just enough super glue to tack them back on to the tubes. Locate, then glue to avoid glue build up and one blade becoming thicker than another. Remove the excess right away with a Q-Tip.
The general sequence that I use to shape the blades is to:
This is delicate work. Use an Exacto knife, emery boards, or Riffler Files (are preferable as their shape is curved and will help you to maintain the Helicoidal shape of the blades as you work them). Use the photos and drawings of the props that you are mastering as references to shape the blades carefully. Alternate, doing a little on each one left and right handed blades. Make them mirror images of one another. I find that putting a shaft into the ends of the tubes periodically and looking at them next to each other when holding them up to a light shows where one or the other needs a bit of sanding to make them match. Use a little filler here and there as needed, especially used in sealing up any remaining stair-steps will speed up the job, and fix any over-zealous sanding sessions! I use Squadron's GREEN STUFF. It dries quickly and sands at about the same rate as the basswood. Add a slight fillet to the blades where they meet with the tubing once you are ready to do so. A thin bead of super glue instead, will add the fillet and some strength as well. Just remember it is hard to sand!
Each blade is carefully filed or sanded with the blade leading edge more round and blunt than the trailing edge, which is sharp with an overall airfoil type shape. Ship propellers at the root can have a very round leading edge and be sharper at the leading edge at the tip nearly as sharp as the trailing edges. The blade taper (root to tip) must be sanded in, too. Lastly, take care that for counter rotating propellers you sand the leading and trailing edges on the correct edge of each blade. Find some pictures of the specific propellers that you are modeling and use them as a shaping guide.
Once you are satisfied with the master blade shapes, from all angles, and they match as close as you can make them, seal them with thin super glue, wiping off the excess with Q-Tips. I also add a piece of brass wire to the end of the blades to act as an index pin for use when assembling the blades to the hubs at this time (cut a small notch and attach them after the blades have been coated. Be careful not to disturb the putty after the super glue has been applied as it may soften temporarily while the glue sets, ruining your smooth finish.
Once completely dry, scuff sand the blades with very fine 400-600 paper and prime them with a couple coats of auto primer. I use a very fine brand of Scotch-Brite to break the glaze on the primer before painting. I coat my masters with rattle-can Epoxy spray paint as a final smooth finish. Epoxy spray generally flows out very well, creating a near mirror finish. Use a good mask, dust on a coat, let dry for a couple minutes, and then, put on another coat or two.
Let the paint DRY!
Let the masters dry for a day or two before making the rubber mold that you use to cast blades for the propeller masters. I apply a coat of Vaseline on the blade masters with a Q-Tip before submerging them in the Mold Making RTV (not the same as bathtub or house calking!). It acts as a mold release and protects the paint against the RTV catalyst. After coating the masters, flow the Vaseline smooth using a hair-blow dryer set on low heat. Easy does it, just enough to remove the streaks.
Next, make your RTV blade mold box, install the blade masters,mix,pour, and de-air the RTV, allow the RTV to cure and then remove the blade masters when the RTV is cured. Do not leave the masters in the RTV because it can attack the paint. Although mold-making RTV is a lot less acid than household silicone RTV, it is still best to remove the masters as soon as curing has occurred, clean and store them for possible future use. Remove the RTV mold from the mold box in preparation for casting.
Preparing the "Pirates crutch" for the blade molds
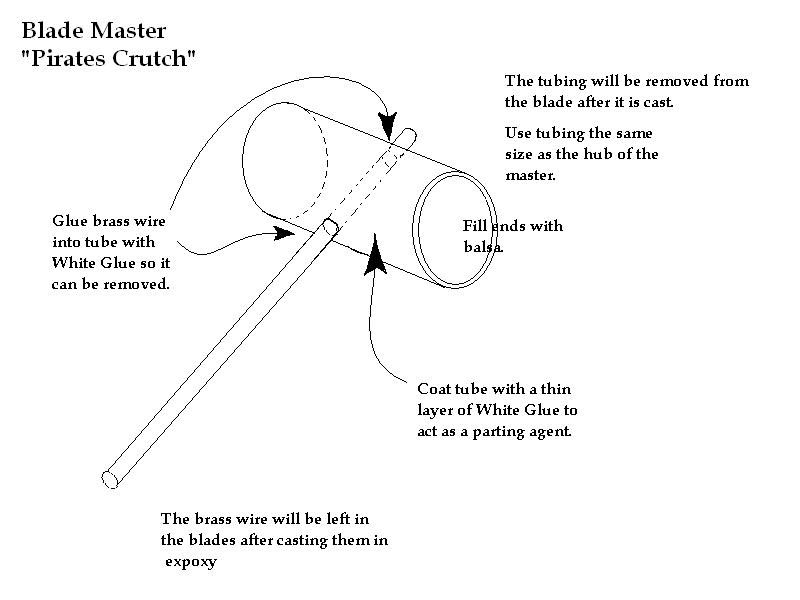
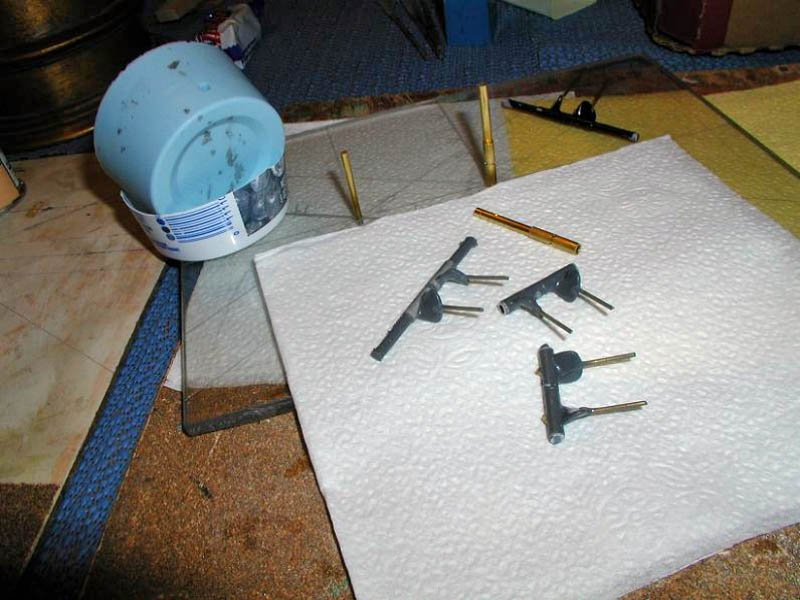
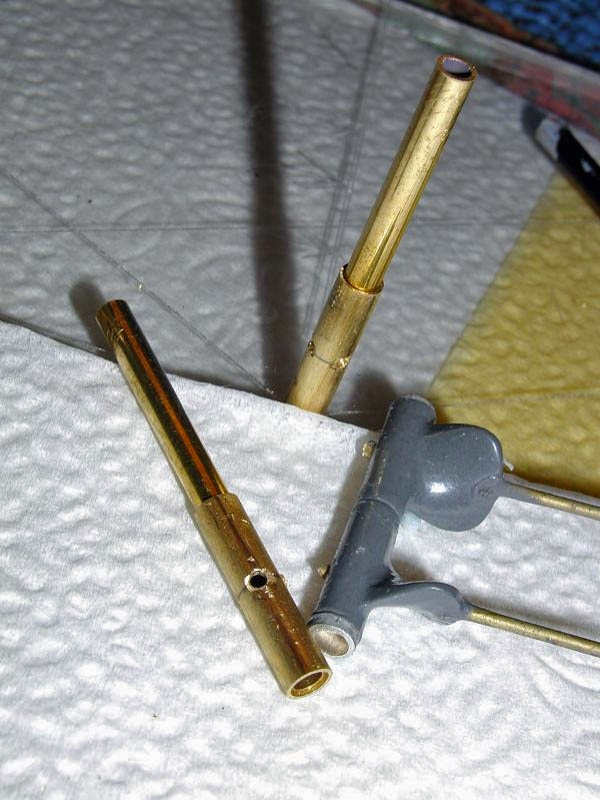
Before casting the blades in long-cure JB-Weld, I cut short pieces of aluminum tubing the same diameter as the tubing used to make the masters (is the same dia. as the hub, and long enough to go past the ends of the blades at the hub attachment end by 1/8 inches or so) and insert a piece of brass wire glued with white glue into a hole drilled in the tube at a right-angle through the center of the tube (looks like a pirate crutch when you are done). I fill the ends of the tube with balsa and then thinly coat the outside of the tube with white glue to act as a parting agent. You will need to do this or else the epoxy will adhere to the tube, which needs to be removed from the blades after they are cast. Only the wires stay in the blades. The tube is important because it fits into the RTV mold and shapes the cast blades where they will fit snuggly against the brass propeller hub when assembling the blades to the propellers. Make as many crutches as you have blades to cast.
Mix enough JB-Weld so that you get a good 50-50 mixture. Small blades don't take much, but if the epoxy won't cure because the mixture is not right you've got a gooey mess to clean out of the mold. Fill the mold with the JB-Weld mixture and let it set for a minute or two to allow trapped air to escape to the top. Next, insert the crutch SLOWLY into the mold so you don't drag air into the mixture. Make sure that the long end of the wire of the crutch fits into smoothly into the wire-hole left in the mold by the master blade when the mold was made. The tubing of the crutch fits into the space left by the tubing of the master. Hold the top of mold open for a minute to allow any trapped air to escape. Close the mold and squeeze it gently to force out any excess JB-Weld so that the blades cast blades will all be the same thickness. For this application JB-Weld has about a 15 minute working time. Longer than that and air pockets are likely to occur.
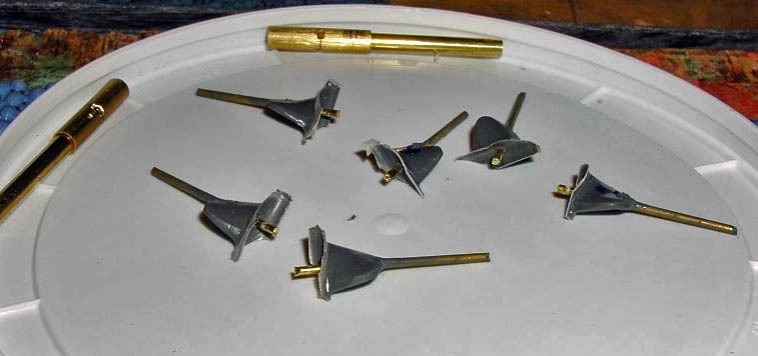
Cast enough blades for your needs and a couple extras. Once the JB-Weld has set remove them from the mold and put them in water to soften the white glue to remove the tubing from the cast blades. The brass wire stays in the blades. Be careful to keep some of the casting-flash at the root of the blade intact. Shape the flash at the root with an emery board so that very little of it is left. Be sure that the shape of the flash is the same for all blades. This area is the "footprint" that will contact the propeller-master hub and needs to be as close to identical for each blade as possible for proper blade alignment and a nice neat looking job. Nip off the end of the wire at the root-end that attaches to the hub. Be sure and leave a little (1/32nd) to fit into the locater holes that will be drilled into the hubs. Too long will prevent the blade from bottoming into the hub and leave a space between the blade root and the hub. The other end of the wire that comes out of the blade tip, leave it long. It will be used as a blade alignment pin in the propeller master assembly fixture.
Propeller Masters Assembly Fixture

The propeller hub tubing inside size will determine what size of the tubing or rod will be used for the mandrel of the Propeller Blade Masters Assembly Fixture.
Use a 1/4th inch thick flat piece of plywood or plastic as a base and layout the blade patterns reference lines (two-sets if you are making counter rotating propellers). If you are making 3 bladed propellers, the reference lines drawn on the base will need to be 120 degrees apart, 90 degrees apart for 4 blader's, etc. A 30 - 60 - 90, or 45 - 45 - 90 degree drawing triangle is needed to mark the reference lines on the base. Take you time and do it as best you can. Once satisfied with the layout of the reference lines drill a small pilot hole at the center of the lines, followed by a drill the size of the mandrel tubing or rod. Keep the drill "square" to the base. A drill press is best used for this. Once drilled to size install the mandrel(s) into the base, making them square to it on all sides by checking with the 90-degree side of your triangle before using super glue to glue them in. Recheck with the triangle periodically as the glue cures, adjusting as needed.
The master hubs are made from telescoped tubing - 3 tubes, 2 are drilled with a hole for each blade, space around the hub evenly (every 90 degrees for four blades, 120 for 3, etc.). The last tube is inserted inside the other 2 tubes after drilling the holes in them (this tube keeps blades from getting glued to the mandrels during assembly.
File flats on the tubes to be drilled, measure, mark and drill. It is important to get the holes spaced evenly as the holes are where the locator pins on the cast blades will go during the prop master assembly. Discard bad hubs.
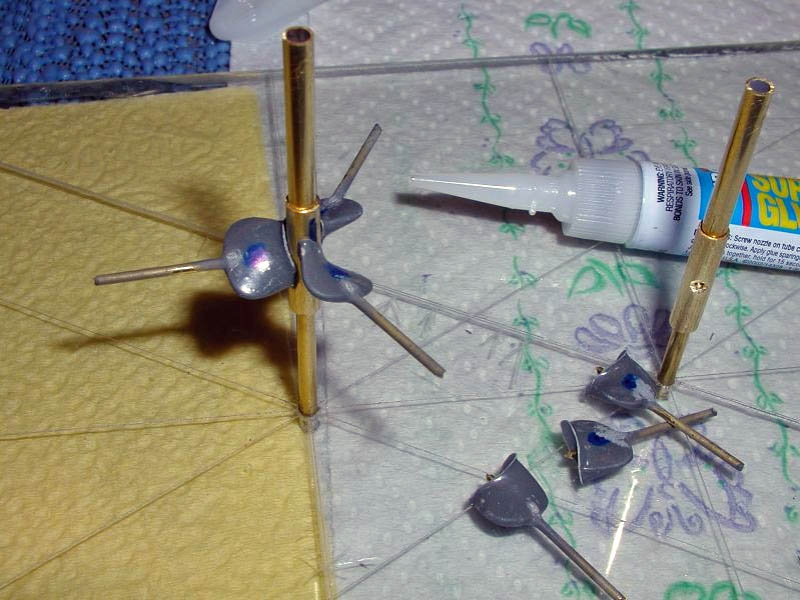
Install the first hub on mandrel and using a square, line up the locator holes in the hub with the reference lines on the fixture. Use masking tape to secure the top of the hub to the mandrel to keep it from turning. Test fit all the blades to their respective holes before gluing them. They should fit very well against the hub and be self-locating and aligning. Once you are satisfied locate and glue on the first blade, check for fit in 3 axis' and remove excess super glue with a Q-Tip. Allow it to set, checking its alignment until completely set. Mark it as the master blade. Make or find a block that will fit under the locator pin at the tip of the blade and mark one side of it with a vertical line. Use it to check alignment of the pin to the reference line on the base of the fixture. Adjust the hub rotation on the mandrel if needed. Locate and glue on the next blade (opposite blade if the prop is a 2, 4, or 6 blader). Check in all 3 axes and against the master blade for fit and location. Use the block to check alignment to the reference line while the glue sets. Locate and glue on the intermediate blades. Install second hub on second mandrel and repeat the steps as for the first propeller master.
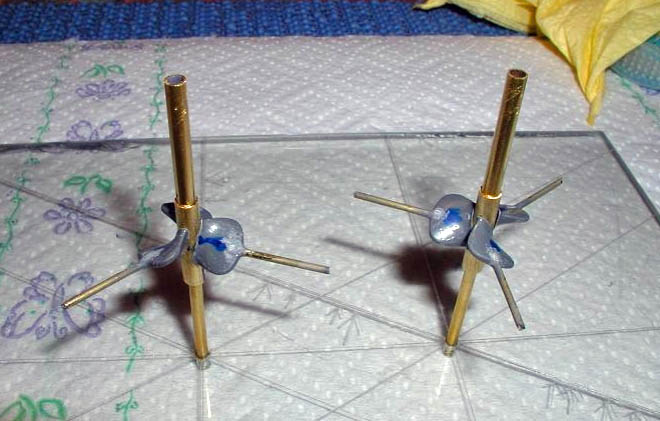
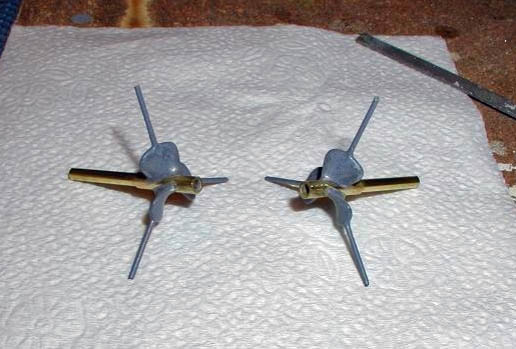
Remove propellers from mandrels. If the hub gets stuck to the mandrel a little heat to the top of the hub can loosen it.
Clean up should be easy, a wipe with alcohol should do. Give the propeller masters a light sanding, and prime/fill/prime, paint as you did for the blade masters. Be sure and Let the paint DRY!
Again, this article is not about mold making. Just be sure and give your newly made and painted propeller masters a thin coat of Vaseline to protect the paint from the catalyst in the RTV mold rubber. Once the mold rubber has cured remove, clean and store the masters. Then cast up some propellers from JB-Weld or make Waxes for Lost Wax Casting. I usually make up a JB-Weld set to put on the model as a placeholder until the others are cast in bronze. The JB-Weld ones will work in case you cannot cast in bronze. Just give them a coat of bronze paint and steam away!
Happy model ship building!
Jerry

Back to Construction Articles
291
Version 1.0 8/06